Hi! Hello! This is how you can learn to solve a Rubik’s Cube! That’s right, YOU can solve the cube! This is the easiest way to get the job done, so let’s get right into it!
Step 1: Notation
Before you solve the cube, you must first learn and memorize cube notation. This is not as hard to learn as it seems. Essentially, notation is a fancy way of giving each move on the cube a specific letter. For example, turning the right face clockwise is called R, turning the left face clockwise is called L, and so on. there are six main notations. These are R, L, U, D, F, and B, each corresponding to a side on the cube. R is right, L is left, U is up, D is down, F is front, and B is back. There are some other advanced notations, but we don’t use them in the beginner method. In addition, a “prime notation” is represented by an apostrophe at the end of the notation. This essentially just means that instead of turning the face clockwise, you must turn it counter clockwise. If the notation is followed by a 2, this just means you must do the move twice. This is all you will need to know for this tutorial.
![How to Solve a Rubiks Cube [ Page discontinued ] | Arvind's blog](https://arvindunimap.files.wordpress.com/2020/03/cubing-notation-1.jpg)
Step 2: The White Side
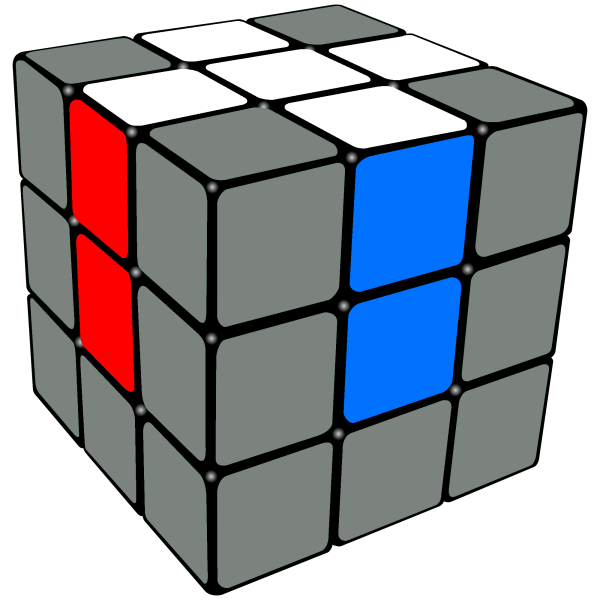
You will notice that the cube has 6 colors. One of these is white, and we must start with this color. There are advanced techniques where you can learn to solve any side first, and we call that color neutral. For this tutorial, we will just go with white. There are three types of pieces on the cube: Edge pieces, corner pieces, and center pieces, each one pretty self explanatory. You will notice that the center pieces never actually move, and all other pieces’ colors never detach from one another. This is important to note. Anyways, our first step is to create a cross shape on the white side using the edge pieces. However, you cannot simply solve the white side and move on. The edge pieces must line up with the center pieces that are closest to the white side. You must move the edge pieces in a way that cohesively works together, because rather than solving the cube one side at a time, you must solve it layer by layer, because this is the easiest way to do it. In fact, it would take knowledge of advanced algorithms and concepts to solve it one side at a time. The way we will solve the white cross is we will move the edge pieces that feature white to the yellow side, so they are are around the yellow center, creating a daisy pattern. These edges must be face up, meaning that the white side is facing up. Then, you can line up each color to it’s respective center piece, one at a time and turn the side twice in order for it to line up with the white center. Do this for each of them.
Now we can solve the rest of the side. Turn the cube upside down, and find the corner pieces that feature white. Then, you can look at the rest of the colors on that piece to determine where it must go. For example, If the piece has red, blue, and white on it, it must go in the red, blue, and white slot so that the piece has white facing down. To do this, simply move the piece over to the top of the slot it must be inserted in, and repeat this algorithm: R U R’ U’. Repeat as many times as necessary until the piece is solved. Now do this for all of the pieces. If a corner piece is already inserted in the slot, but it is inserted correctly, just do the algorithm to remove it, and repeat the algorithm again as many times as necessary. If done correctly, the first layer should be solved, meaning the white side is completely solved, and the bottom “block” of the cube is in order.
Step 3: The Second Layer
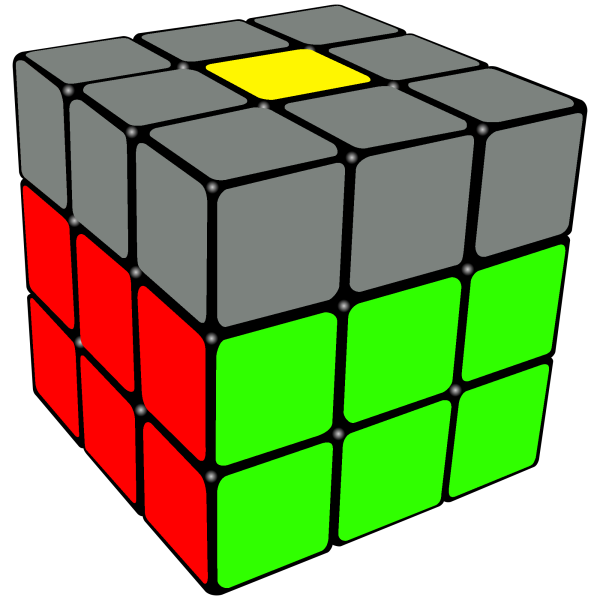
This is where stuff starts to get a little weird. We must insert the edge pieces into each slot so that they correspond with the corner below them, all without scrambling the white side. To do this, you must do an algorithm, which has two variants that you will need to know. Find an edge piece without and yellow on it. Let’s say that you have found the red and blue edge piece. What you must do now is insert it on top of the red, white, and blue corner piece so that they line up. Look at the color that is closest to facing the bottom of the cube. Let’s say that it is red. So, you must turn the top face until it lines up with the red center. Now, determine where it must go by looking at the other color, which in this case is blue. Blue, on a normal cube that is upside down, is to the left of red. So, to insert it, do this algorithm: U’ L’ U L U F U’ F’, and the piece is now inserted. However, in this example, if the other color is green (which is to the right of red) you must do the other variation of this algorithm: U R U’ R’ U’ F’ U F. Repeat this for all pieces, and the first two layers are solved.
Step 4: The End… (I made that way too dramatic)
Essentially, now we must solve the last layer. We must first solve the yellow cross. You will have 1 of 3 cases. A dot, or simply a center with no edges, a line, or an “L” shape with two edges. For the line, turn the front face clockwise, do the four corner insertion moves from earlier, and turn the front face back. For the L, do the same, but instead of turning one front layer, turn the first two. For the dot, do a combination of the two, which is the line algorithm followed by the L algorithm. The cross is now solved, however the edges may not be. If they are all correct, good for you. If you have two correct, that form an L shape of their own, hold the cube so one of them is on the right and one is on the back. Now do this algorithm: R U R’ U R U2 R’. Now, the next step is to “solve the corners”. This can be tricky. You can have one of three cases, one corner is solved, none are solved, or all of them are solved. Even though some corners may not look solved, they could actually be in the right place. To determine this, look at the colors on the corner. Let’s say we have the red, yellow, and blue corner that is in between the red and blue edge pieces on the top face. This corner is correct. Let’s also say that this is the only corner that is correct. If this is true, hold the cube so that the corner is in the bottom right of the face, and do this algorithm: U R U’ L’ U R’ U’ L. If none of the corners are correct, do this from anywhere, and repeat until all corners are in the right place. Now comes the part where everyone messes up at least once. Turn the cube upside down, so that white is once again the top face. Look at the corner in the bottom right. If it has yellow facing down, turn the bottom face clockwise so that you bring over the next corner. DO NOT TURN THE WHOLE CUBE, OR YOU WILL MESS UP THIS STEP. Now look at the new corner, if it does not have yellow facing down, do the four corner insertion moves over and over again until it is solved. Then, move over the next corner, and repeat it again. Do this for all corners, and congratulations, you should have solved the cube!